Table of Contents
ToggleA well-organized kitchen makes meal prep faster, reduces daily stress, and prevents the chaos of hunting through cluttered shelves for a single spice jar. Kitchen cabinets often become catch-all zones where Tupperware lids vanish and expired cans linger for years. The good news? Reorganizing doesn’t require a full remodel or expensive custom inserts, just a clear plan and a few hours. This guide walks through the best way to organize kitchen cabinets step by step, from emptying every shelf to maintaining a system that actually sticks. Whether tackling upper cabinets, drawers, or awkward corner spaces, the process stays the same: assess, zone, maximize, and maintain.
Key Takeaways
- Organizing kitchen cabinets starts with emptying every shelf, sorting items into Keep, Donate, Trash, and Relocate categories, then measuring dimensions to guide future purchases for space-maximizing organizers.
- Zone your kitchen by activity and frequency—place cooking items near the stove, prep tools near the sink, and everyday dishes at waist-to-shoulder height—to streamline workflow and reduce daily stress.
- Maximize vertical space using shelf risers, tension rods, lazy Susans, and pull-out sliding shelves to eliminate wasted height and access hard-to-reach items in deep cabinets without expensive custom renovations.
- Transfer dry goods into clear, airtight, stackable containers with labels showing item names and fill dates to extend shelf life, prevent pest issues, and maintain accurate inventory at a glance.
- Maintain your organized kitchen cabinets through daily habits like the ‘one in, one out’ rule, weekly zone checks, and quarterly resets—consistency and clear labeling ensure the system actually sticks.
- Corner cabinets and upper shelves pose special challenges; use turntables for base corners, accept upper zones as deep storage for seasonal items, and always use a sturdy step stool to prevent falls.
Empty and Assess Your Cabinet Space
Start by pulling everything out. Every dish, every can, every mystery container from the back corner. Set items on counters or a cleared table, grouped loosely by type, plates with plates, canned goods together, baking supplies in one area.
While cabinets are empty, wipe down all shelves with a damp microfiber cloth and mild cleaner. Check for shelf liner damage, sticky residue, or pest evidence. Replace torn liner now: it’s easier than wrestling with it around stacks of dishes later.
Sort items into four categories:
- Keep: Items used regularly and still functional
- Donate: Duplicate tools, dishes in good shape but never used
- Trash: Expired food, broken lids, chipped glassware
- Relocate: Items that don’t belong in the kitchen (office supplies, pet meds)
Be ruthless. If a gadget hasn’t been touched in a year, it’s taking up real estate someone else could use. Toss anything expired or stale, including spices older than two years, which lose potency.
Measure shelf heights and widths while cabinets are empty. Jot down dimensions for any problem areas: shallow shelves that waste vertical space, deep cabinets where items get lost in back, corner cabinets with dead zones. These measurements guide purchases for risers, lazy Susans, or pull-out drawers later.
Zone Your Kitchen by Activity and Frequency
The single most effective strategy for how to arrange kitchen cabinets is zoning, grouping items by task and placing them near where they’re used. This mimics commercial kitchen logic and cuts down on unnecessary steps.
Create functional zones:
- Cooking Zone: Near the stove. Store oils, spices, utensils, pots, and pans here. Keep everyday spices at eye level: specialty seasonings can go higher.
- Prep Zone: Near the sink or main counter. House cutting boards, knives, mixing bowls, and colanders within arm’s reach.
- Baking Zone: If baking regularly, dedicate one cabinet or shelf to flour, sugar, baking soda, measuring cups, and mixing tools. Place it near counter space used for rolling dough.
- Serving Zone: Near the dining area or dishwasher. Stack everyday plates, bowls, and glasses here. Place items used daily at waist-to-shoulder height: formal china or seasonal pieces go higher or lower.
- Food Storage Zone: Pantry items, canned goods, dry pasta, and snacks. Group by category, breakfast, grains, canned vegetables, baking staples.
Many homeowners wonder where to put things in kitchen cabinets, the answer hinges on use frequency. Items touched daily (coffee mugs, dinner plates) deserve prime real estate between waist and eye level. Occasional-use items (holiday platters, specialty appliances) get relegated to upper shelves or harder-to-reach cabinets.
Drawers vs. cabinets: Implementing zones where to put things in kitchen cabinets and drawers helps streamline workflow. Utensils, flatware, and small tools go in drawers near the prep or cooking zone. Reserve cabinets for taller or bulkier items. If drawer space is tight, use shallow pull-out organizers inside lower cabinets for lids, cutting boards, or baking sheets stored vertically.
Maximize Vertical Space with Shelves and Risers
Standard cabinet shelves often sit 10 to 12 inches apart, leaving several inches of wasted height above shorter items like mugs or canned goods. Shelf risers and stackable organizers reclaim that dead space without permanent modifications.
Add-on shelf inserts (wire or plastic) rest on existing shelves and create a second tier. These work well for mugs, spices, or small plates. Choose adjustable-width models to fit snugly without sliding around.
Tension rods installed vertically near the cabinet front create dividers for baking sheets, cutting boards, and lids stored on edge. This keeps flat items upright and visible instead of stacked in a toppling pile.
Under-shelf baskets hook onto existing shelves and hang down, adding storage for lightweight items like sandwich bags, aluminum foil boxes, or dish towels. Check basket depth to ensure cabinet doors still close.
Lazy Susans maximize corner cabinet space and deep shelves. A 12-inch or 16-inch turntable brings items from the back to the front with a quick spin. Use them for oils, vinegars, condiments, or canned goods. Two-tier lazy Susans double capacity in tall cabinets.
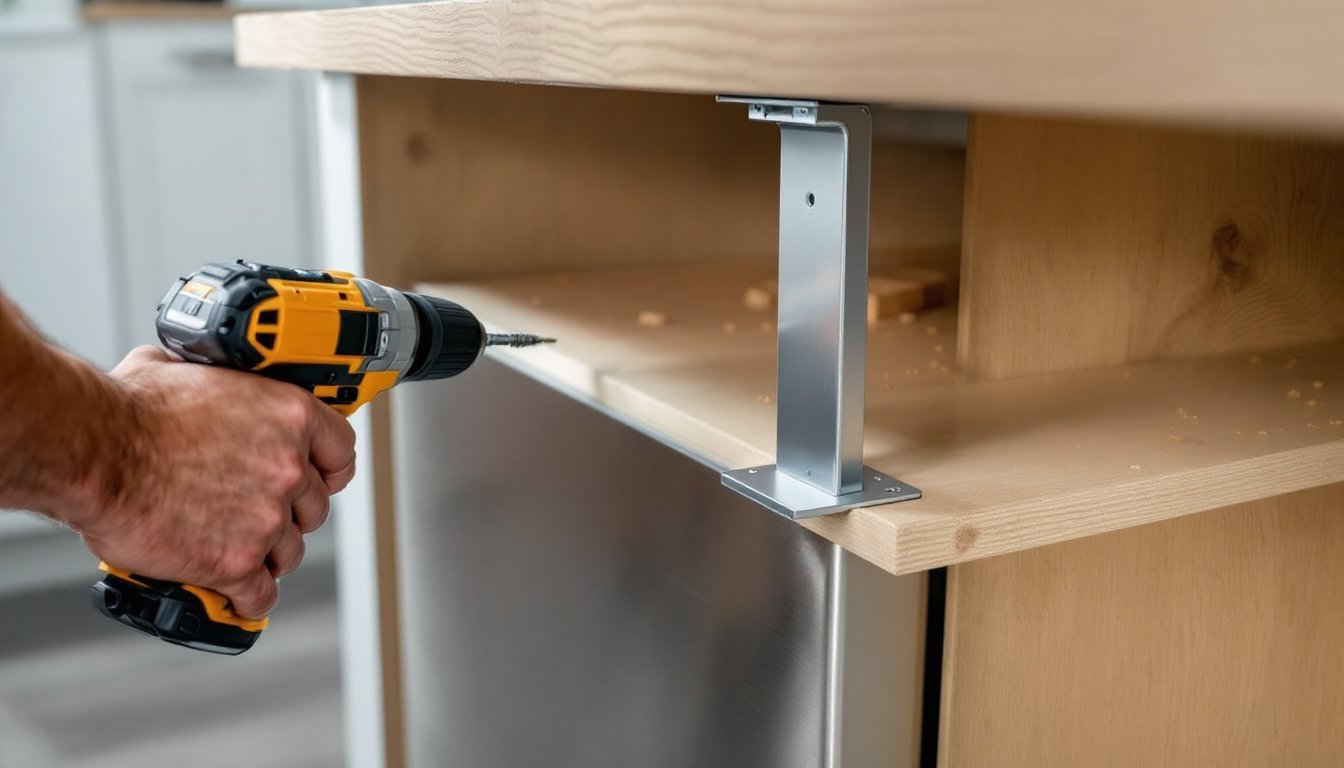
For very deep cabinets (24 inches or more), consider pull-out sliding shelves. These retrofit units mount to existing cabinet frames and require a drill, screws, and about 30 minutes per shelf. They’re a game-changer for lower cabinets where kneeling and reaching becomes a chore. Measure the cabinet opening carefully, most sliders need at least a 1/4-inch clearance on each side.
When evaluating kitchen design ideas, vertical maximizers rank among the most cost-effective upgrades, often costing $10 to $40 per unit versus hundreds for custom cabinetry.
Use Clear Containers and Labels for Pantry Items
Transferring dry goods from original packaging into clear, airtight containers isn’t just aesthetic, it extends shelf life, deters pests, and makes inventory visible at a glance.
Choose containers with these features:
- Airtight seals: Silicone or locking lids keep moisture and bugs out. Critical for flour, sugar, rice, pasta, and cereals.
- Stackable shapes: Square or rectangular containers use space more efficiently than round jars.
- Clear material: BPA-free plastic or glass lets you see when supplies run low without opening lids.
- Uniform sizes: Matching heights and widths create clean visual lines and stack securely.
Measure shelf height before buying. A 10-inch-tall container won’t fit on a shelf with 9 inches of clearance.
Label everything. Use a label maker, chalkboard labels, or painter’s tape and a permanent marker. Include the item name and expiration or fill date for flours, grains, and baking powder. Rotate stock by using older items first.
For items that don’t justify a full container, snack bars, tea bags, seasoning packets, use clear bins or baskets to corral similar items. A labeled “breakfast” bin might hold oatmeal packets, granola bars, and coffee filters. A “baking” bin collects chocolate chips, sprinkles, and food coloring.
Skip opaque bins for pantry staples. If you can’t see what’s inside, the system breaks down fast. Reserve opaque storage for cleaning supplies or non-food items stored elsewhere.
Maintaining strategies for decluttering includes regular inventory checks, monthly for high-turnover items, quarterly for specialty ingredients.
Optimize Corner Cabinets and Hard-to-Reach Areas
Corner cabinets and upper shelves above 6 feet present the toughest organizational challenges. Items migrate to the back, become unreachable, or get forgotten entirely.
For corner base cabinets:
- Lazy Susan turntables (12 to 20 inches) bring back-corner items to the front. Two-tier models work for tall cabinets.
- Pull-out corner organizers with swinging shelves (sometimes called “magic corners”) mount to the cabinet door and swing out when opened. These require installation but maximize every cubic inch.
- Store bulky, low-frequency items here: large mixing bowls, slow cookers, specialty appliances used a few times a year.
For upper corner cabinets:
- Install a lazy Susan if shelves are fixed.
- Use the space for lightweight, infrequently used items: holiday dishes, extra mugs, vases.
- If the corner is nearly inaccessible, accept it as “deep storage” and keep a step stool handy.
For shelves above 6 feet:
- Store items used once or twice a year: punch bowls, seasonal decor, canning jars.
- Use a sturdy step stool with a handrail, not a kitchen chair. Falls from improvised ladders send thousands to the ER yearly. Wear non-slip shoes and keep one hand free to steady yourself.
- Label bins clearly so you can identify contents from below without hauling everything down.
Deep lower cabinets (24+ inches):
- Install pull-out drawers or sliding shelves (around $30 to $80 per unit). Mounting requires a drill and basic carpentry skills.
- Alternatively, use stackable pull-out bins that don’t require installation. Place heavy items like small appliances in the front, lighter items toward the back.
Don’t let hard-to-reach zones become black holes. Assign them specific purposes and review contents every six months.
Maintain Your Cabinet Organization System
A cabinet system only works if it’s maintained. Household routines, new purchases, and seasonal shifts constantly test organization.
Daily habits:
- Return items to their zones immediately after use. If a family member can’t figure out where something goes, the system needs clearer labels or more intuitive placement.
- One in, one out rule: When a new kitchen gadget arrives, retire or donate an old one.
Weekly check:
- Scan for items that migrated to wrong zones. Reset them.
- Wipe up spills on shelves before they harden.
Monthly review:
- Check pantry containers for low stock: add items to the shopping list.
- Toss expired food, stale snacks, or anything past prime.
Quarterly reset:
- Pull everything out of one zone at a time (don’t overhaul the whole kitchen at once).
- Reassess whether the zone placement still makes sense. If prep tasks shifted to a new counter area, move the prep zone accordingly.
- Deep-clean shelves and liners.
Annual overhaul:
- Repeat the full empty-and-assess process, especially before holidays or major cooking seasons.
- Evaluate whether organizers are still serving their purpose. Lazy Susans that spin off-center, broken risers, or warped bins get replaced.
Teach the system to everyone in the household. Label shelves if needed. If kids or a partner can’t maintain zones, simplify categories or use more visual cues (picture labels for young children, color-coded bins).
Consistency beats perfection. A simple system followed daily outperforms an elaborate setup that gets abandoned within a month.
Conclusion
Organizing kitchen cabinets isn’t a one-time project, it’s an evolving system that adapts to cooking habits, household size, and available tools. Start with a full empty-and-sort, zone items by task and frequency, reclaim wasted vertical space, containerize pantry staples, and tackle tough corners with the right inserts. Most importantly, build daily habits that keep the system running. A well-organized kitchen saves time, reduces food waste, and turns meal prep from a scavenger hunt into a streamlined routine.