Table of Contents
ToggleA dishwasher that vibrates, shifts, or tilts during a wash cycle isn’t just annoying, it’s a sign of improper installation. The culprit? Often, it’s a missing or incorrectly installed dishwasher mounting bracket. These small but critical hardware pieces anchor the appliance to your countertop or cabinet, preventing movement that can damage water lines, loosen electrical connections, or crack adjacent cabinetry. Whether you’re installing a new unit or securing an existing one that’s gone wobbly, understanding how dishwasher mounting brackets work, and how to install them correctly, can save you from costly repairs down the line. This guide walks through bracket types, installation steps, and the common mistakes that turn a straightforward task into a headache.
Key Takeaways
- A dishwasher mounting bracket prevents costly damage by securing your appliance to the countertop and preventing dangerous shifts, vibration, and door seal leaks during operation.
- Top-mount brackets suit wooden and laminate counters, while side-mount brackets or adhesive pads work better for stone, granite, and frameless European-style cabinets.
- Always level your dishwasher before installing the mounting bracket, then predrill pilot holes in wood counters to prevent splitting and ensure a secure hold.
- Common mistakes like using wrong screw lengths, skipping pilot holes, and over-tightening fasteners can damage your countertops or strip the bracket—measure twice and use hand tools for final tightening.
- A properly installed dishwasher mounting bracket installation takes only 15 minutes and prevents years of potential water damage, electrical issues, and cabinet harm.
What Is a Dishwasher Mounting Bracket and Why You Need One
A dishwasher mounting bracket is a metal or plastic clip that secures the top or sides of a dishwasher to the underside of your countertop or adjacent cabinetry. Most models use one or two dishwasher mounting clips at the top front corners, though side-mount configurations exist for frameless European-style cabinets or installations without a solid countertop overhang.
Why bother? Building codes and appliance manufacturers both require secure mounting. An unmounted dishwasher can:
- Tip forward when the door opens, especially under the weight of a loaded rack
- Vibrate loose during the wash or spin cycle, stressing water supply lines and drain hoses
- Shift out of alignment, causing door seal gaps that lead to leaks
- Damage adjacent cabinets through repeated contact during operation
Most dishwashers ship with a dishwasher mounting kit that includes the necessary brackets, screws, and sometimes a template. If your unit didn’t come with hardware, or if you’re retrofitting an older model, aftermarket kits are widely available and typically universal across brands. Just confirm the bracket style matches your cabinet and countertop configuration before purchasing.
Types of Dishwasher Mounting Brackets Explained
Not all dishwasher brackets are identical. The type you need depends on your countertop material, cabinet construction, and dishwasher design.
Top-Mount Brackets (Standard)
The most common style. These L-shaped metal or plastic clips attach to pre-drilled holes or slots on the top front edge of the dishwasher. The bracket’s longer arm extends upward and screws into the underside of a wooden or composite countertop. They’re the go-to for laminate, butcher block, or plywood counters.
Side-Mount Brackets
Used when top mounting isn’t feasible, for example, with granite, quartz, or concrete countertops that can’t be easily drilled. A dishwasher side mounting bracket attaches the appliance’s sides to the adjacent cabinet frames. Frameless (European-style) cabinets often require this method since they lack a face frame for traditional anchoring.
Stone Countertop Adapter Kits
Some manufacturers offer specialized hardware for stone installations. These kits use adhesive pads or expandable anchors that grip the countertop’s underside without drilling. They’re not universal, so verify compatibility with your dishwasher model.
Adjustable Clips vs. Fixed Brackets
Adjustable clips have slotted screw holes that let you fine-tune height and angle after initial placement, helpful if your countertop isn’t perfectly level. Fixed brackets mount in a single position and work best when cabinet openings are square and countertops are true.
When shopping for replacement dishwasher mounting brackets, note the screw hole spacing and bracket depth. Measure the gap between your dishwasher’s top edge and the countertop underside: brackets typically need 1/2″ to 1″ of clearance to function.
Step-by-Step Guide to Installing a Dishwasher Mounting Bracket
Mounting a dishwasher isn’t complex, but it does require attention to detail. Rushing through or skipping prep steps is how units end up crooked or loose.
Preparing Your Cabinet and Tools
Before touching the bracket, ensure your dishwasher is correctly positioned. Slide the unit into the cabinet opening, leaving about 1/8″ clearance on each side. Check that the front of the door sits flush with adjacent cabinet faces, if it’s recessed or protruding, adjust the leveling legs at the base.
Tools you’ll need:
- Cordless drill/driver with Phillips and flathead bits
- #2 Phillips screwdriver (manual backup if working in tight spaces)
- Adjustable wrench or 3/8″ nut driver (for leg levelers)
- Tape measure
- Flashlight or headlamp
- Safety glasses (drilling overhead poses eye hazard from debris)
Materials checklist:
- Dishwasher mounting bracket(s) from your kit
- #8 x 5/8″ wood screws (typically included: if not, choose screws that won’t penetrate the full countertop thickness)
- Masking tape (to mark screw locations)
- Shims (if leveling is needed)
Verify the dishwasher is level front-to-back and side-to-side using a spirit level placed on the top front edge and across the open door. An out-of-level unit won’t drain properly and may cause door seal issues. Adjust the front legs until the bubble centers, the rear legs are usually fixed or self-leveling.
Once level, turn off power at the breaker before proceeding. Although you’re not working directly on electrical components, accidental contact with the junction box during installation is possible. Many workshop projects require similar precautions when mixing electricity and hand tools.
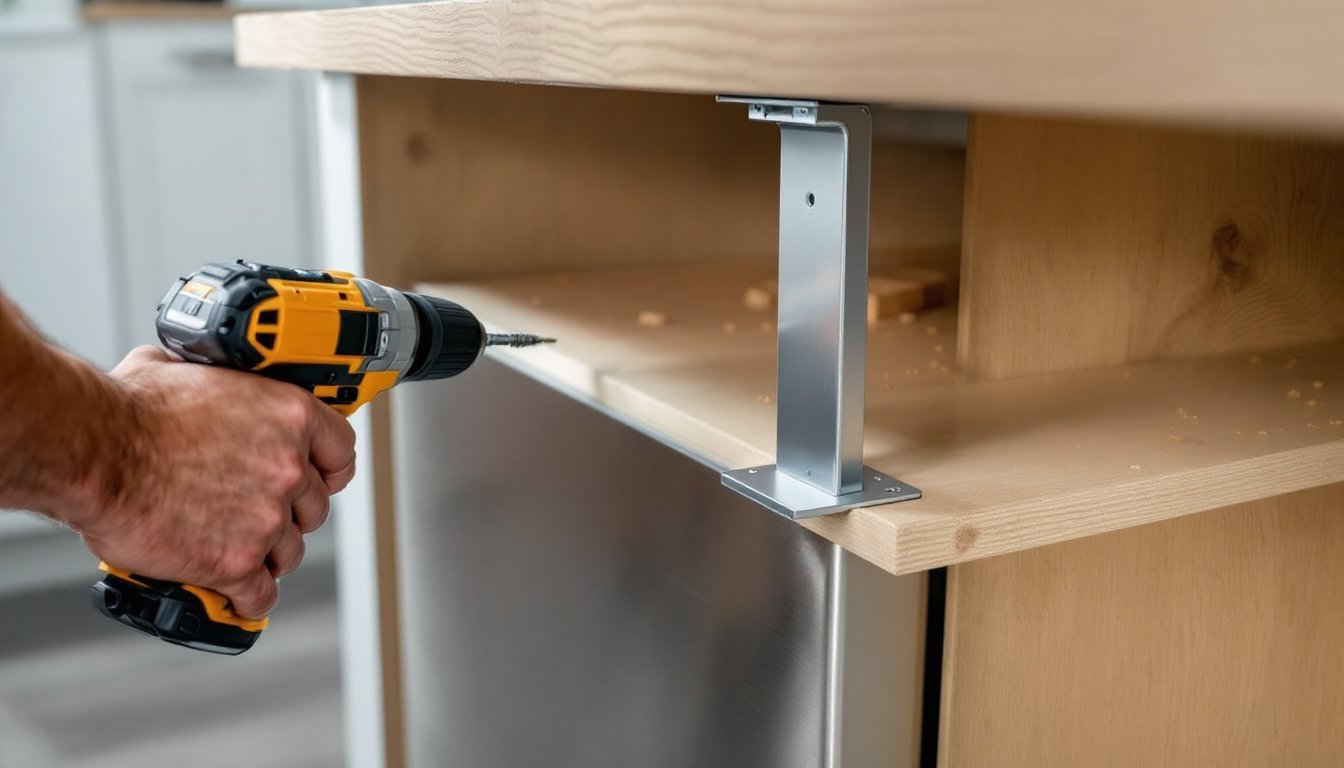
Attaching the Bracket to Your Countertop
With the dishwasher in final position and level, locate the mounting tabs or holes on the unit’s top front edge. Most models have slots or threaded inserts on the left and right corners.
-
Attach the bracket to the dishwasher first. Loosely thread the bracket onto the dishwasher’s mounting tab using the provided screw or bolt. Don’t tighten yet, you need wiggle room to align with the countertop.
-
Mark your drill point. Hold a flashlight under the counter and look up from inside the dishwasher cavity. You should see the bracket’s top arm pressed against the countertop underside. If the bracket has a screw hole, use a pencil or awl to mark the center point through the hole onto the wood. For stone counters using side brackets, mark the cabinet’s interior side panel instead.
-
Predrill the pilot hole (wood countertops only). Remove the dishwasher slightly or reach in with a drill. Use a 1/8″ bit to drill a pilot hole about 1/2″ deep into the countertop underside. This prevents the wood from splitting and makes driving the screw easier. Do not drill through the countertop surface.
-
Drive the mounting screw. Reposition the bracket, align its hole with your pilot, and drive the #8 screw snugly. The bracket should hold firm without visible flex, but don’t overtighten, stripping the threads in particleboard or MDF is easy.
-
Repeat on the opposite side. Most installations use two brackets (one per corner). Follow the same sequence: attach bracket to dishwasher, mark, drill, drive screw.
-
Tighten the dishwasher-side fastener. Now that the bracket is anchored to the counter, secure the dishwasher end of the bracket with a final turn. This locks everything in place.
-
Test for movement. Gently pull the dishwasher door open and press down on the open door’s edge (as if loading a heavy pot). The unit shouldn’t tip or shift. If it does, check that both brackets are seated and screws are snug.
For dishwasher side mounting bracket installations, the process is similar but screws drive into the cabinet’s side panel instead of the countertop. Ensure screws bite into solid wood, cabinet sides are often 1/2″ or 5/8″ plywood, so use appropriately sized screws (typically #8 x 3/4″).
If your countertop is granite or quartz, skip steps 3 and 4 and use adhesive-backed mounting pads or side brackets exclusively. Drilling stone requires diamond bits, a steady hand, and is generally best left to pros unless you’re experienced. The detailed installation process for various countertop types can clarify material-specific techniques.
Common Installation Mistakes and How to Avoid Them
Even a simple bracket can go sideways. Here’s what trips up DIYers.
Using the wrong screw length. Too short, and the screw won’t hold. Too long, and it punctures your laminate or granite surface. Measure the countertop thickness (typically 3/4″ for wood, 1-1/4″ for stone) and choose screws that penetrate no more than halfway.
Skipping the pilot hole. Particleboard and MDF countertops are brittle. Driving screws without a pilot splits the material and leaves a weak hold. Always predrill in composite materials.
Mounting before leveling. If you secure the brackets and then discover the dishwasher is tilted, you’ll need to back out screws and start over. Level first, mount second.
Over-tightening fasteners. Brackets are thin metal. Cranking down with a drill’s max torque bends the bracket or strips threads. Switch to a manual screwdriver for the final turn.
Forgetting side clearance. A dishwasher jammed tight against cabinet sides can’t be properly leveled and puts stress on brackets during vibration. Maintain 1/8″ gap on each side: use shims if the opening is oversized.
Not checking countertop type. Wood and laminate take screws easily. Stone, glass, or tile do not. Verify your countertop material before grabbing the drill. For challenging materials, consult a professional installation guide to avoid cracking expensive surfaces.
Ignoring manufacturer instructions. Bracket placement and hardware specs vary by model. GE, Bosch, Whirlpool, and KitchenAid all have slightly different mounting systems. Check your manual for torque specs, bracket orientation, and clearance requirements.
If you encounter resistance when driving screws, stop. Forcing hardware can crack countertops, strip bracket holes, or damage the dishwasher’s top rail. Back out, assess, and adjust your approach.
Conclusion
A properly installed dishwasher mounting bracket takes maybe fifteen minutes but prevents years of potential trouble. Whether you’re using standard top clips, side brackets, or a specialized mounting kit, the principles stay the same: level the unit, predrill when needed, and don’t overtighten. With the right hardware and a methodical approach, your dishwasher will stay put through thousands of cycles, no wobbles, no leaks, no regrets.